They might not be the equivalent of an actual beach vacation, but these tropical nail art designs are sure to transport you to paradise.
Thứ Năm, 27 tháng 4, 2017
Summer 2017 Nail Trends
Summer spring has technically sprung, Mother Nature seems to be grappling with some seasonal schizophrenia. Ditch the mittens and warm up your fingertips with scenes of palm trees, sunsets and sandy white beaches.
They might not be the equivalent of an actual beach vacation, but these tropical nail art designs are sure to transport you to paradise.
They might not be the equivalent of an actual beach vacation, but these tropical nail art designs are sure to transport you to paradise.
Thứ Ba, 25 tháng 4, 2017
summer watermelon keg
Looking for an excuse to throw an epic party this summer? We think this trick for turning a watermelon into a keg is reason enough to celebrate! We love this easy-to-follow recipe from Tablespoon because it saves you from playing bartender at your summer cookout and it couldn't be more simple to make.
First, find a watermelon that's relatively flat on the bottom, so it can stand up on its own (or lop off one end to get to stand upright). Start by chopping off the top, either straight across or in a zig-zag pattern if you want to get fancy.
Then use a spoon or an ice cream scoop to scrape out the juicy goodness from inside. (Don't let the fruit go to waste—mix it with any clear alcohol in a blender to create your party punch, and set aside.) Once the interior of your future keg is cleaned out, drill a hole about two to three inches above the bottom. This is where you'll attach your spigot.
Your watermelon keg is now ready for business! Pour in your boozy watermelon cocktail blend, or opt for kid-friendly alcohol-free punch—after all, adults aren't the only ones who appreciate some good 'ol summertime fun!
Thứ Năm, 20 tháng 4, 2017
Simple pop up card tutorial
Step 1: Supplies and Prep
To create a simple pop up card, you'll need two blank cards of the same size, one for the cover and one for the 3D sculpture. The 3D sculpture is made separately and is glued on the card. It's best to use blank cards of the same color to camouflage the 3D sculpture somewhat.
To make stamped pop-up elements you will need white cardstock and colored cardstock formats.
Gather a variety of paper and cardstock that coordinate with the colors used on your card.
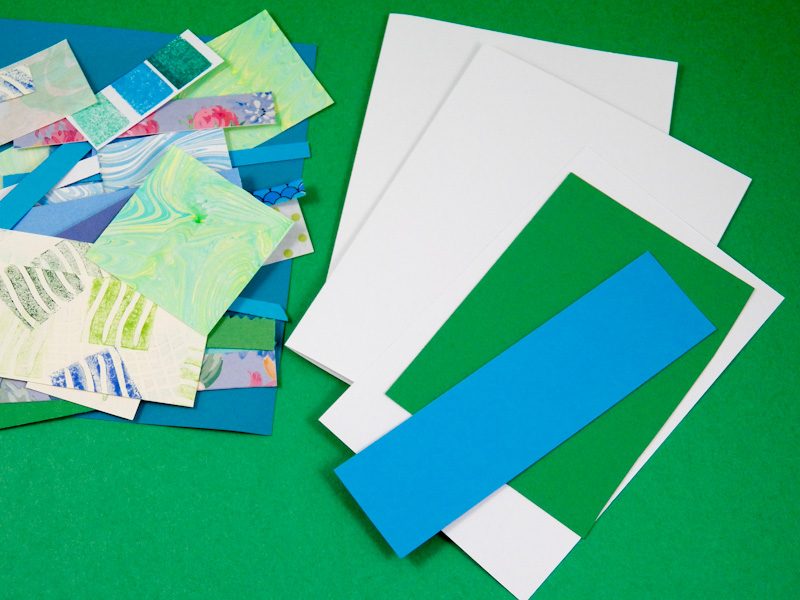
Step 2: Make Card cover
Use one of the blank cards to make the card cover. The card cover can be made using any technique you like; however, it is important that the card have a horizontal aspect to make the most effective use of the step pop-up. Set aside the completed card cover while you make the pop-up.
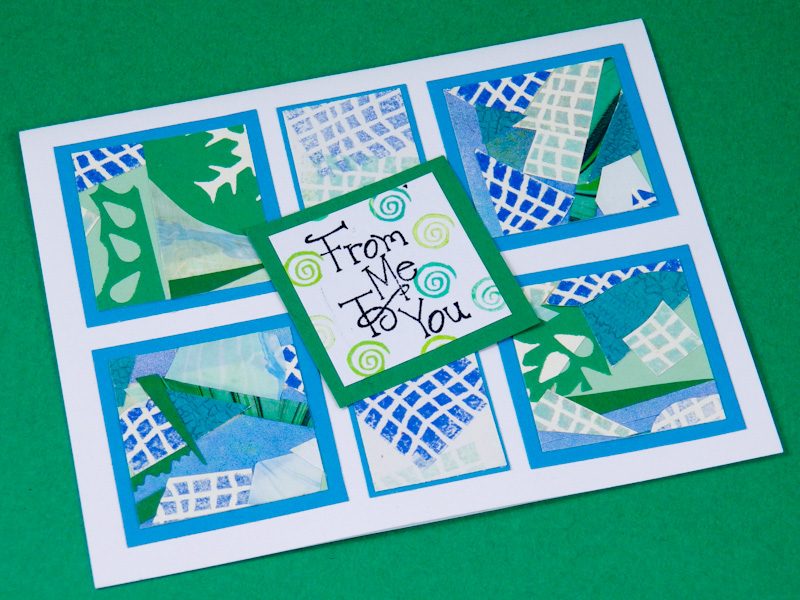
Step 3: Make Pop-Up Elements
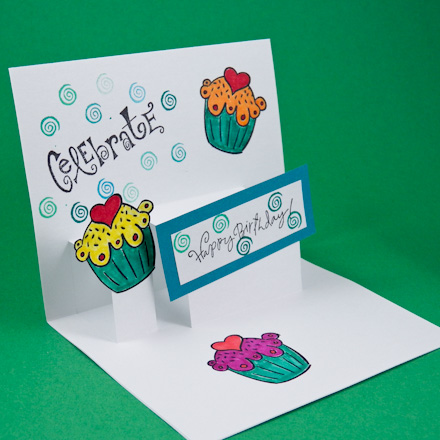
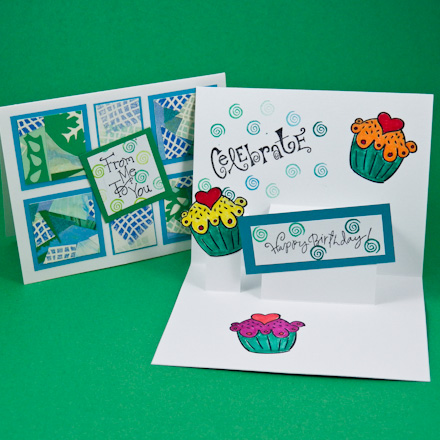
Pop-up elements are glued to the pop-up steps/platforms. Anything that is flat and will fit inside the folded card can be used. For the sample card, a stamped, matted message card and a stamped cutout are used. Your matted message card should be about 1¼" to 1½" by 3¼" to 3½". The cutout can be up to about 2" square.
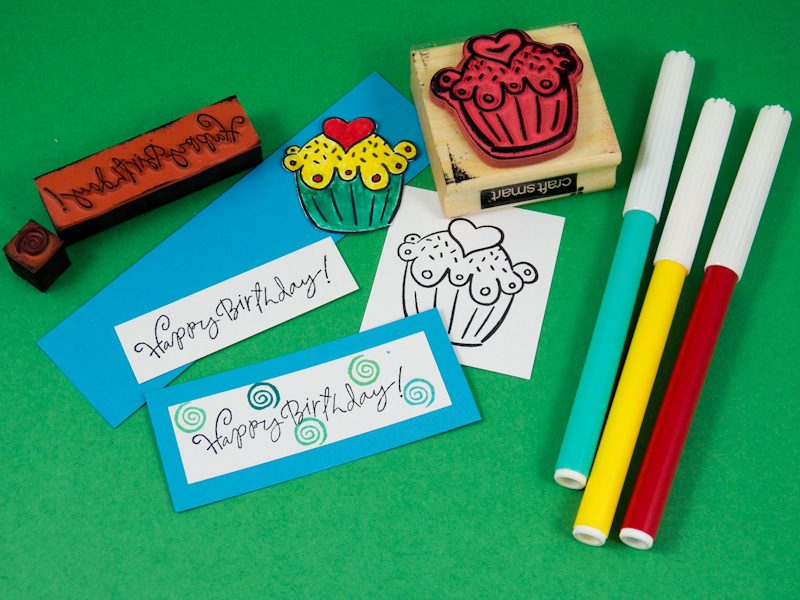
Tip: Use felt-tip markers to color the stamped image and tiny rubber stamps to decorate the message card.
Step 4: Make Step Pop-Up
+Use the second folded blank cards to make the pop-up mechanism. To form the pop-up steps/platforms, you will cut parallel slits from the folded edge of the blank cards.
First, use the pencil and ruler to draw a line 1½" from the folded edge and parallel to it. Next, draw two vertical lines from the first line to the folded edge—they should be about 2½" apart and parallel to each other. The left line should be about ¾" from the left edge of the blank cards.
About ¾" to the right of the first step, draw the second step. Draw a line 1¼" from the fold with vertical parallel lines that are ¾" apart.
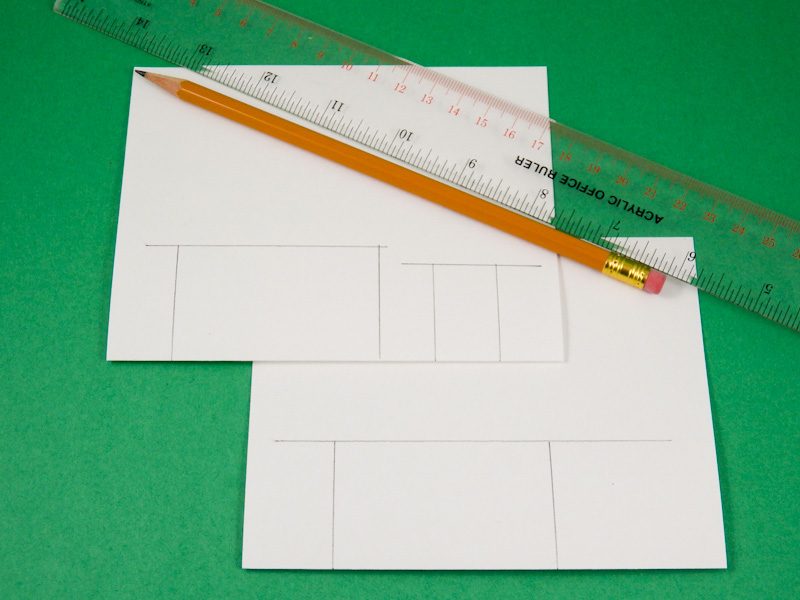
Tip: For a simpler pop-up, only make the first step. It can be drawn anywhere along the fold, but no closer than ¾" from either side.
Tip: Skip the measuring by using templates. See the side bar to the right for details.
Cut on the vertical lines from the folded edge to the drawn horizontal line.
Fold the cut steps on the horizontal line between the cut lines. Unfold.
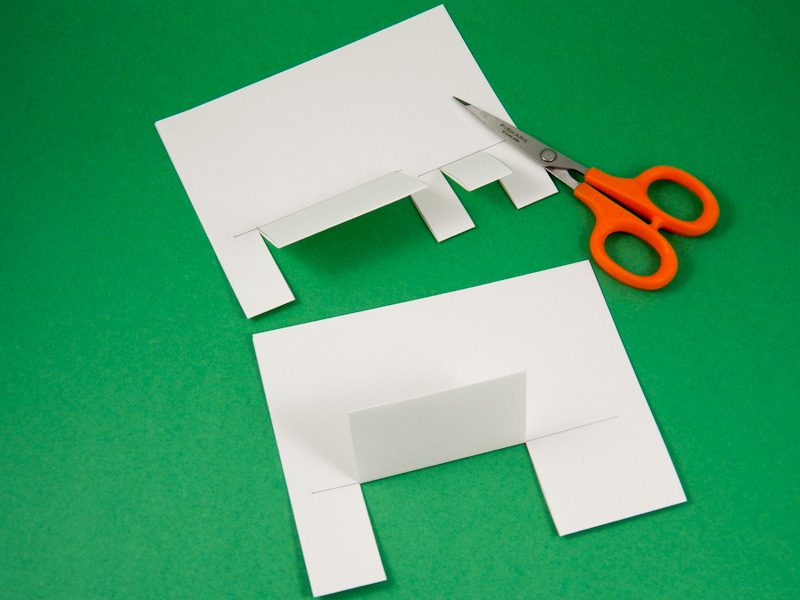
Open the blank cards and push the steps through to the other side. With the pencil lines on the outside, fold the blank cards at a 90° angle. You will be gluing the pop-up elements to these steps/platforms.
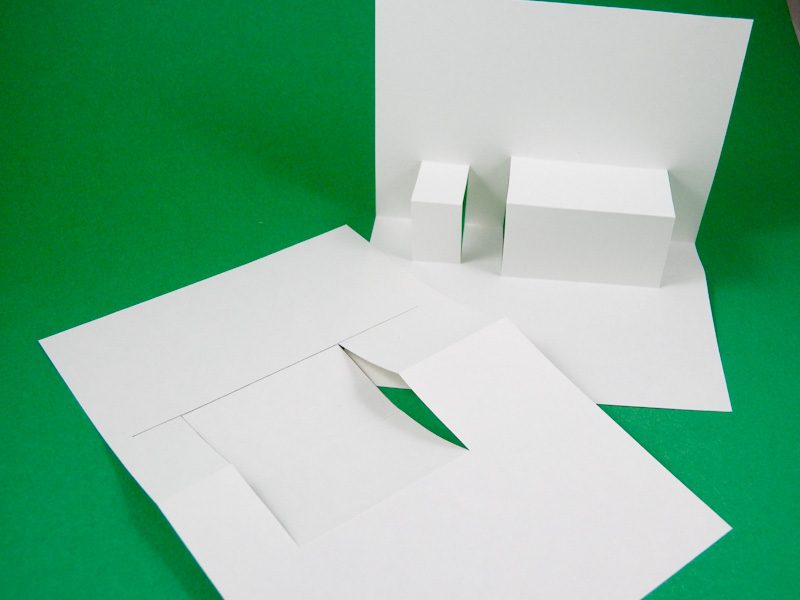
Step 5: Test Pop-up Mechanism
Test your pop-up mechanism by making sure it folds flat. Also, use repositionable tape or glue to attach the pop-up elements to the pop-up steps. Fold the pop-up flat and make sure the pop-up elements do not extend beyond the edges of the folded card.
Make any adjustments needed before proceeding.
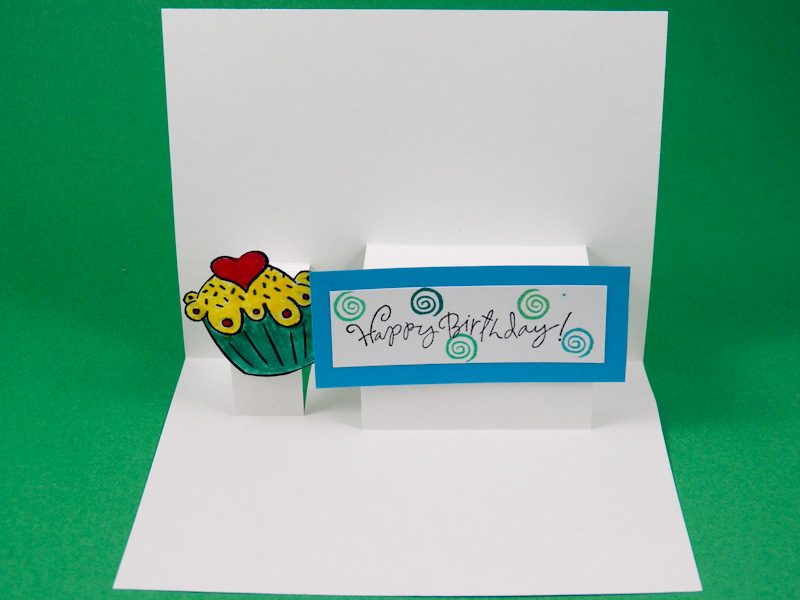
Step 6: Glue Together
Glue the pop-up mechanism inside the card cover, being sure to align the edges. Apply glue to one side of the pop-up, avoiding the step, and slip it inside the card cover. Apply glue to the other side and fold the card cover over onto it.
Open the card and allow the glue to dry.
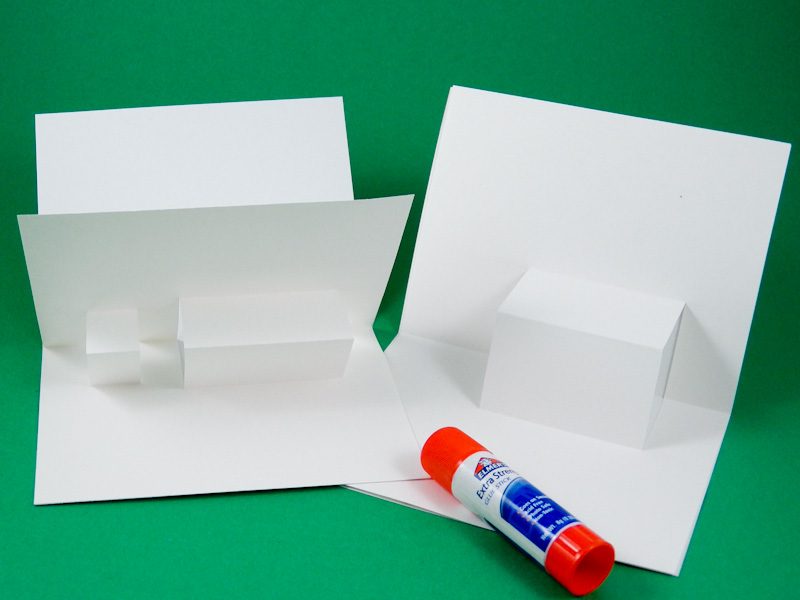
Step 7: Glue Pop-Up Elements and Finish Card
Glue the pop-up elements to the steps. Decorate the card behind and around the pop-up steps. You might stamp more images of the cutout, add a greeting or write a message. Use your imagination!
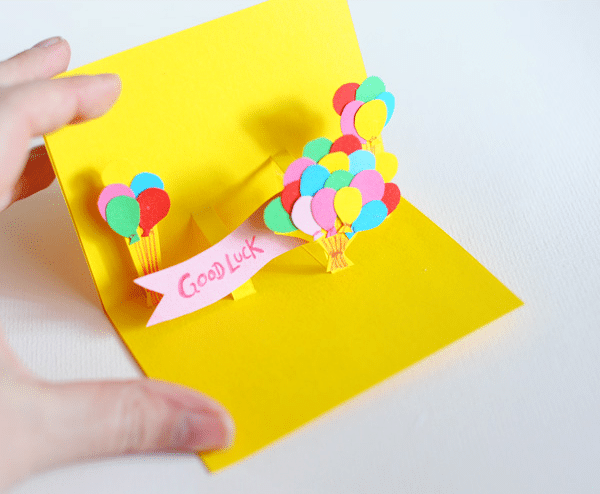
Pop up card tutorial- Good luck 3D card
For starter, there's no need to rush right into intricate, complicated folding and glueing techniques. A simple-diy-lover should start with basic pop up card designs like this. Not to mention, you can use the basic technique in this Pop up card tutorial for an endless amount of different pop-up cards.
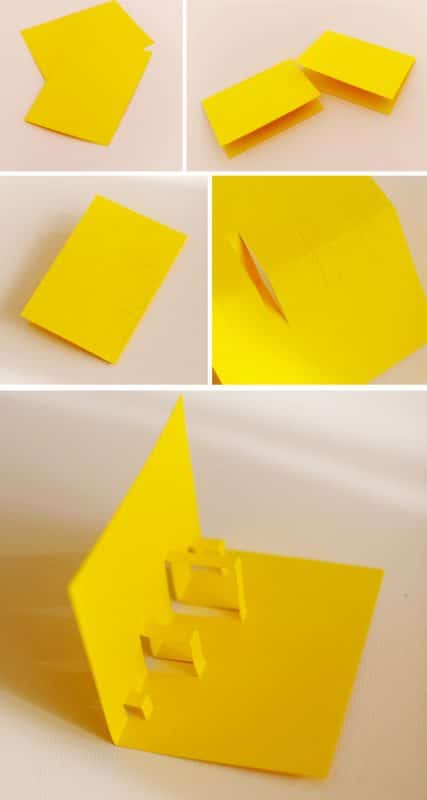
 Start with a simple sheet and fold it in half. Then cut parallel lines (in pairs of the same length) into the middle fold as shown in the picture. The cuts should be of max half the length of the card (otherwise they’ll stand out when you close it).
Push the flaps forward until your card looks like in the bottom picture.
 Now start crafting the details and pieces to display in your card. You can make some balloons and a Good Luck sign like these ones.
Stick these with paper glue onto the front (not the top) part of the folded out flaps. Now when you close your card, it’ll look like in the bottom left picture. Just take a 2nd card and glue it on to cover the outside.
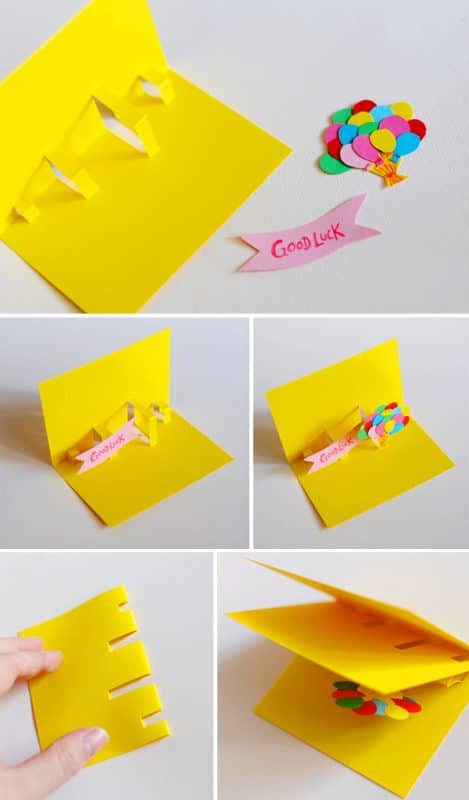 Stick some more balloons, or whatever it is you’re crafting, onto the flaps and voilà – you’re done. You could still add a background to the top and bottom halves. Stick on some clouds in the top part, some grass in the lower one for example.
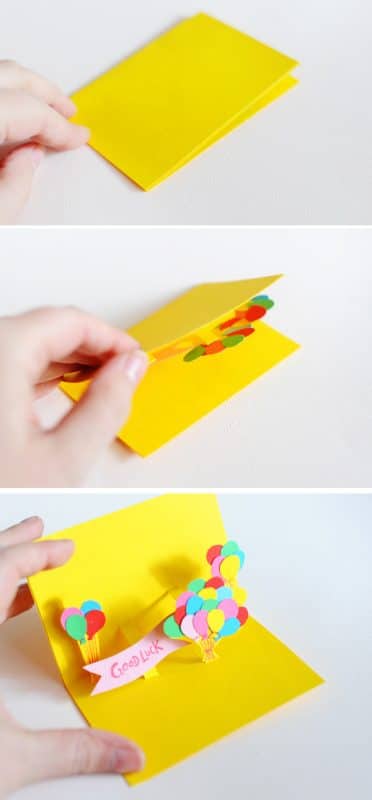
 Start with a simple sheet and fold it in half. Then cut parallel lines (in pairs of the same length) into the middle fold as shown in the picture. The cuts should be of max half the length of the card (otherwise they’ll stand out when you close it).
Push the flaps forward until your card looks like in the bottom picture.
 Now start crafting the details and pieces to display in your card. You can make some balloons and a Good Luck sign like these ones.
Stick these with paper glue onto the front (not the top) part of the folded out flaps. Now when you close your card, it’ll look like in the bottom left picture. Just take a 2nd card and glue it on to cover the outside.
 Stick some more balloons, or whatever it is you’re crafting, onto the flaps and voilà – you’re done. You could still add a background to the top and bottom halves. Stick on some clouds in the top part, some grass in the lower one for example.

Thứ Ba, 18 tháng 4, 2017
Coachela 2017- Best dressed
At Coachella, it hasn’t been all about the music for a long time. The art installations, the cuisine, the latest technology, and the celebrity culture all contribute to Coachella’s identity, sometimes even rivaling the supposed reason for having the festival in the first place. High on this list is Coachella fashion, which is enough of an institution that other brands have tried to capitalize on it.
Recent years have seen gradual shifts, and almost gone are the over-the-top costumes donned by the candy kids of the last decade. These days, comfort is in, and while skin can still be seen across the Polo Fields, there’s a little more sophistication with every new year of the festival.
Thứ Bảy, 15 tháng 4, 2017
Easter Basket for her- Easter 2017
This Easter, treat the lovely lady in your life with a little pampering. Whether it’s for your wife, mom, girlfriend, sister, or best friend, a lovely and thoughtful basket filled with spa-themed goodies is the perfect thing for helping her to unwind this Sunday and in the weeks to come.
Fill an Easter basket with some DIY Bunny Bath Salts, festive bunny slippers, and a gift certificate to a nearby spa.
Make store-bought shower gel festive by pouring it inside a new container such as this Gama Go Hunny Bunny.
Here are some other Easter-basket ideas perfect for pampering someone you love: Essie nail polish with nail files EOS lip balm Voluspa Mokara Candle Bottle of wine Candy Necklace or bracelet..
Thứ Tư, 12 tháng 4, 2017
10 Beauty Essentials to Pack in Your Travel Bag
Whether you're heading out for a long weekend or a couple of weeks away, there's no need to say bon voyage to looking your best. Travel light and still feel like you have all your makeup and hair needs on hand with this jet-setter's checklist of what to stow when you're on the go.
1. Dry Shampoo
Because let's be honest, we're not washing our hair every day on vacation. This Klorane dry shampoo won't leave white powdery residue on your roots and works like gangbusters on yesterday's grease.
2. Razor
This razor comes with all the goodies you need for a smooth shave, but is tiny enough to tote around in a makeup bag. At journey's end, toss it out. The extra room in your bag may not make that much of a difference, but sometimes every bit counts.
3. Face Cleanser
Don't leave your skin-care routine back home. Keep on top of it by bringing along your daily cleanser AND oil. Caudalie's two-in-one formula gently removes makeup, tones, and moisturizes the skin, and comes in a convenient TSA-friendly size.
4. BB Cream
Sure, you could cram five items into your cosmetics pouch. Or you could add just one. Most bb creams act as skin perfectors, primers, moisturizers, sunscreens, and foundations, making them multitasking makeup superstars that should definitely get a first-class ticket on any trip.
5. Fragrance
Those gorgeous fragrance bottles on your vanity are great, but when you want a scent to go, pick up one in a travel-sized package. These slender vials easily slip into your bag and will never seep or spill, which means you can smell as lovely in your own zip code as you do in areas yet to be explored.
6. Deodorant
Escaping to balmy Thailand or chilly Iceland? Either way, be prepared to stay your freshest. We like this Milk Makeup natural deodorant that's roll-on and fits into even the smallest of spaces. Good things do indeed come in small packages.
7. Mascara
It's a given, but that doesn't mean you should take pause before adding your favorite mascara into the mix. We often switch from an everyday formula to a waterproof one when we hit the road. That way we're covered, should we find ourselves stuck in a rainstorm while walking along the Avenue Montaigne or the Wall of China. In a pinch, we also have used mascara as liquid eyeliner.
8. Lip Balm
Keep your pout nourished and soft with a moisture-boosting lip balm.
9. Liquid Lipstick
Looking vibrant in the sun with some lipstick on. With liquid lipstick, your color will stay all day for you to the swimming pool and your summer cocktail.
10. Travel Manicure Kit
Don't be distracted by that chipped nail or stray brow hair when you should be focusing on having fun. This itty-bitty five-in-one grooming kit lets you take care of business and move on to more important things. We even add a needle and bit of thread to the kit for emergency sewing repairs.
1. Dry Shampoo
Because let's be honest, we're not washing our hair every day on vacation. This Klorane dry shampoo won't leave white powdery residue on your roots and works like gangbusters on yesterday's grease.
 |
| Klorane Dry Shampoo with Oat Milk, $10; |
2. Razor
This razor comes with all the goodies you need for a smooth shave, but is tiny enough to tote around in a makeup bag. At journey's end, toss it out. The extra room in your bag may not make that much of a difference, but sometimes every bit counts.
 |
| Gillette Venus Snap Women's Razor, $6 |
3. Face Cleanser
Don't leave your skin-care routine back home. Keep on top of it by bringing along your daily cleanser AND oil. Caudalie's two-in-one formula gently removes makeup, tones, and moisturizes the skin, and comes in a convenient TSA-friendly size.
 |
| Caudalie Make-Up Removing Cleansing Oil, $28 |
Sure, you could cram five items into your cosmetics pouch. Or you could add just one. Most bb creams act as skin perfectors, primers, moisturizers, sunscreens, and foundations, making them multitasking makeup superstars that should definitely get a first-class ticket on any trip.
 |
Smashbox Camera Ready BB Cream SPF 35, $39;
|
Those gorgeous fragrance bottles on your vanity are great, but when you want a scent to go, pick up one in a travel-sized package. These slender vials easily slip into your bag and will never seep or spill, which means you can smell as lovely in your own zip code as you do in areas yet to be explored.
 |
| Clean Reserve Travel Spray Layering Trio, $50 |
6. Deodorant
Escaping to balmy Thailand or chilly Iceland? Either way, be prepared to stay your freshest. We like this Milk Makeup natural deodorant that's roll-on and fits into even the smallest of spaces. Good things do indeed come in small packages.
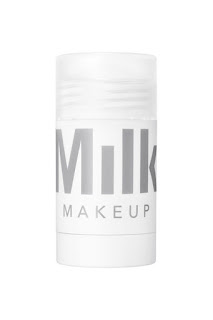 |
| Milk Makeup Natural Deodorant, $14 |
7. Mascara
It's a given, but that doesn't mean you should take pause before adding your favorite mascara into the mix. We often switch from an everyday formula to a waterproof one when we hit the road. That way we're covered, should we find ourselves stuck in a rainstorm while walking along the Avenue Montaigne or the Wall of China. In a pinch, we also have used mascara as liquid eyeliner.
 |
| Lancome grandiose waterproof mascara, $32 |
8. Lip Balm
Keep your pout nourished and soft with a moisture-boosting lip balm.
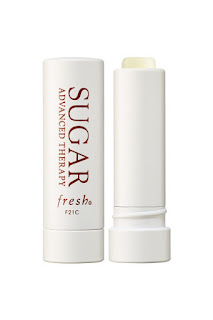 |
| Fresh Sugar Advanced Therapy Lip Balm, $26 |
9. Liquid Lipstick
Looking vibrant in the sun with some lipstick on. With liquid lipstick, your color will stay all day for you to the swimming pool and your summer cocktail.
 |
| MegaLast Liquid Catsuit Matte Lipstick, $5 |
10. Travel Manicure Kit
Don't be distracted by that chipped nail or stray brow hair when you should be focusing on having fun. This itty-bitty five-in-one grooming kit lets you take care of business and move on to more important things. We even add a needle and bit of thread to the kit for emergency sewing repairs.
 |
| Danielle Creations Rose Gold Manicure Set, $20 |
Thứ Sáu, 7 tháng 4, 2017
8 Pro Tips & Ideas that Make Organizing Your Closet a Breeze
1. Stay true to your style.
Having a defined style makes it that much easier to buy pieces that work as part of a “wardrobe,” rather than just filling your closet with “clothes.” It also helps when editing. Don’t worry about how long it’s been since you’ve worn something; it’s more important to ask
2. Switch out the seasons.
Unless you travel often to different climates, there’s no reason to look at your white linen dresses in the middle of winter. Switching out the seasons reacquaints you with what you have, gives you more room, and is the perfect opportunity to de-clutter the space.
3. See what you’re working with.
Sometimes you need to see the pieces to envision an outfit. If not hung, pants, sweaters, and t-shirts are better off folded on shelves so you can see them and wear them. Drawers should be reserved for things you don’t need to see to make an outfit: intimates, work-out clothes, and pajamas.
4. Organize by category.
Group like things together: tops, pants, skirts, and dresses should each have a section of the closet. From there, you can simply color code. Some people prefer to keep specific pieces together: camisoles, short sleeves, cardigans, etc. There’s no right or wrong answer, whatever makes finding and putting it back easiest for you.
5. Group things how you wear them.
If you have specific clothes for work versus casual, keep them separate. For most, that just means one side of the closet versus the other. Do the same with formal wear. If not worn often, clean and keep in a hanging garment bag in the back of the closet.
6. All the same hangers? Not necessarily.
Different clothes need different hangers. Coats and jackets are best on wood hangers. And while lots of people love their Huggable Hangers, the brand’s option for pants and skirts is a waste of space. I like the individual pant/skirt hangers with the center hook so you can hang them off each other to make use of vertical space (see below).
7. Clothes facing you.
A popular organizing rule is all clothes should be facing the same way. I say your clothes should be facing you. If you’re standing near the center of your closet, clothes on the left should be facing right, and vice versa. I hate it when clothes have their back to you!
8. Think outside the closet.
If your existing closet is too small or hard to access (like typical reach-in closets), think of getting a standing wardrobe for greater visibility and accessibility. You’re in there at least once a day, so make it as pleasant as possible.
Đăng ký:
Nhận xét (Atom)


